
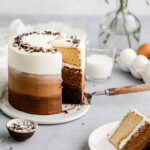
Chocolate Ombre Cake
This post is sponsored by Wilton.
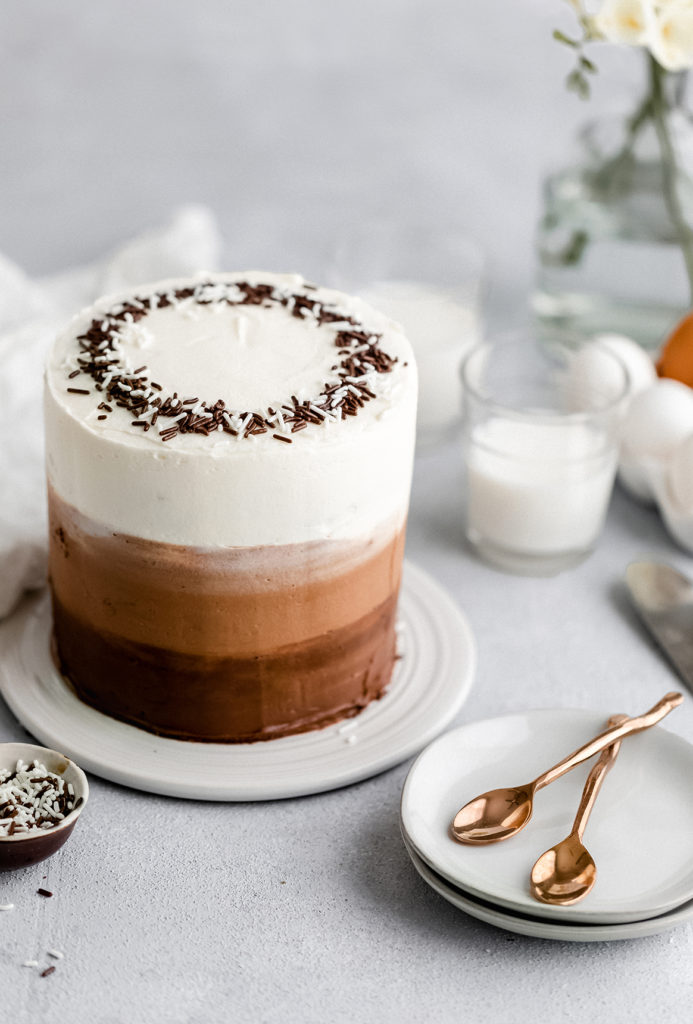
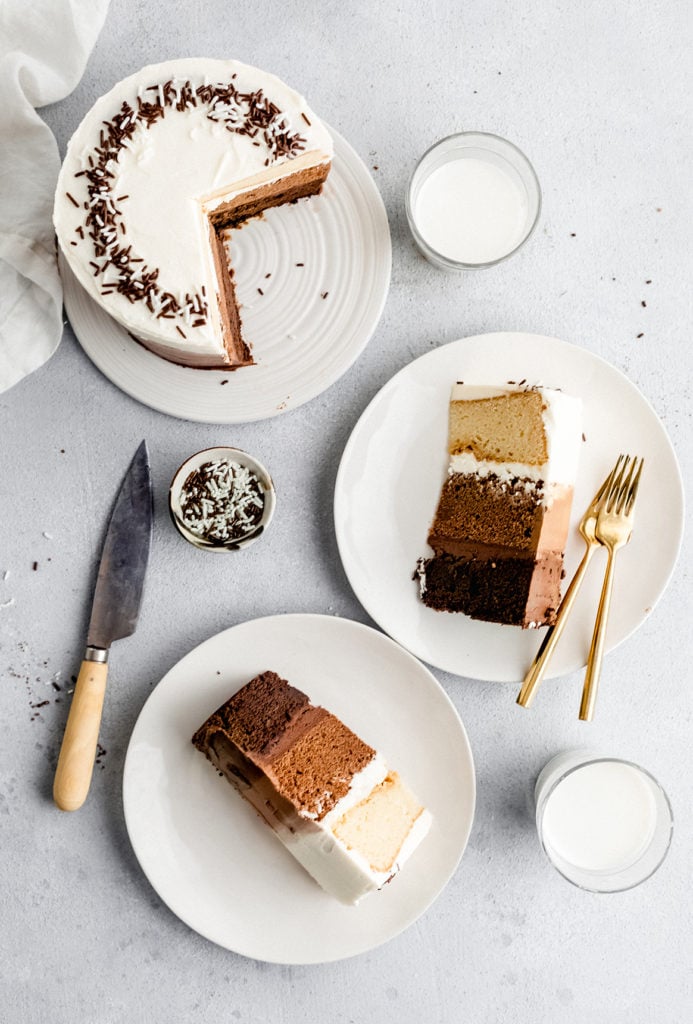
This chocolate ombre cake is delicious and easy to make! Dark, milk and white chocolate layers are covered with smooth Warm Vanilla and Rich Chocolate icing, making this a show-stopper dessert perfect for any occasion!
If you’ve been following me for a while, you know I love a good chocolate cake. So I thought why not create a triple chocolate cake, covered in delicious icing from Wilton’s new line of Naturally Flavored Icing.
What you need to make this cake
Before starting any recipe, I like going through all the ingredients, utensils and bakeware I need and set up my kitchen.
First, you’re going to need 3 6-inch cake pans. If you only have one, it’s ok, the process is just going to take longer. I like to grease the bottom and sides of my pans and also line the bottom with parchment paper.
One thing that I’ve started using when making layered cakes is baking strips. These are super helpful because they prevent domes and encourage even baking.
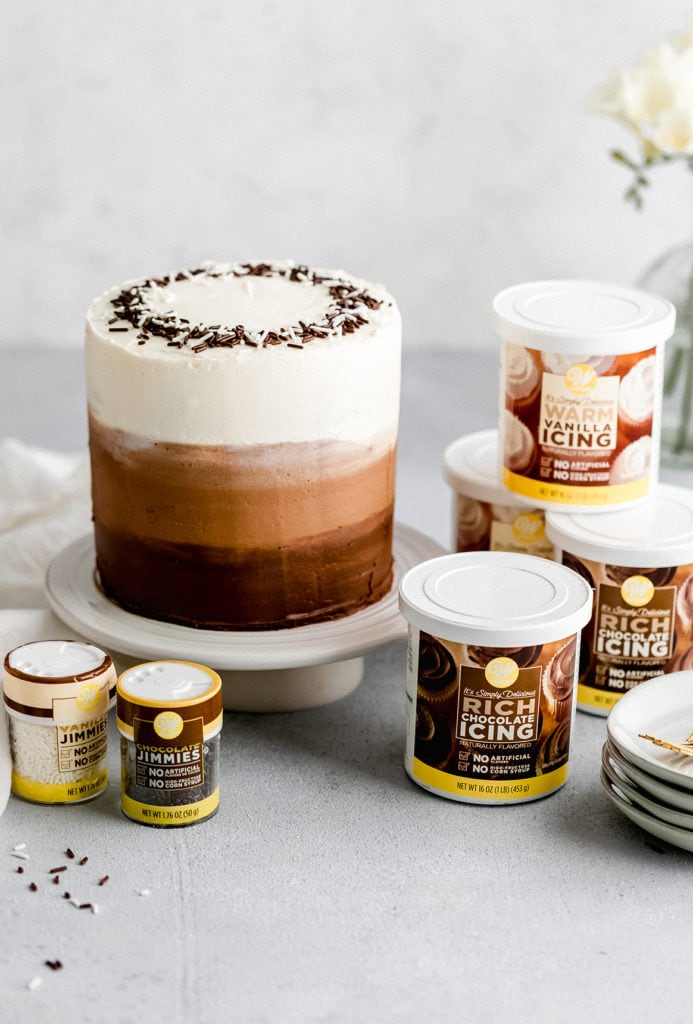
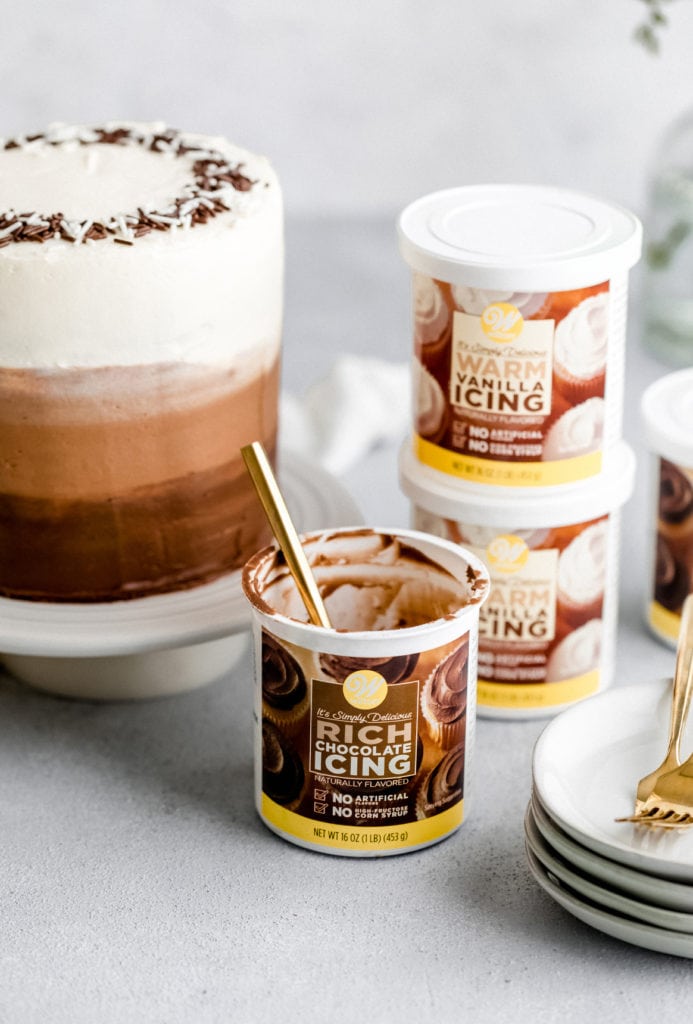
The most important things you’ll need are Wilton icing & sprinkles! If you know me, you know I love using high quality ingredients, so I was super excited to try Wilton’s new products. They are simply delicious, free of artificial colors, artificial flavors and high fructose corn syrup. What more can you ask for?
Here’s a list of what I used to decorate this cake:
- Naturally Flavored Vanilla Icing
- Naturally Flavored Rich Chocolate Icing
- Naturally Flavored Vanilla Jimmies Sprinkles
- Naturally Flavored Chocolate Jimmies Sprinkles
HOW TO MAKE AN OMBRE CAKE
Ombre cakes are so beautiful but they can look a little intimidating. The truth is, if you follow these simple steps you’ll be surprised at how easy this cake comes together.
- One thing I’ve learned is to keep my work area organized. Since this cake has 3 layers and 3 icing colors, I found it super helpful to have everything in place. One bowl for each cake layer, and one bowl for each icing color.
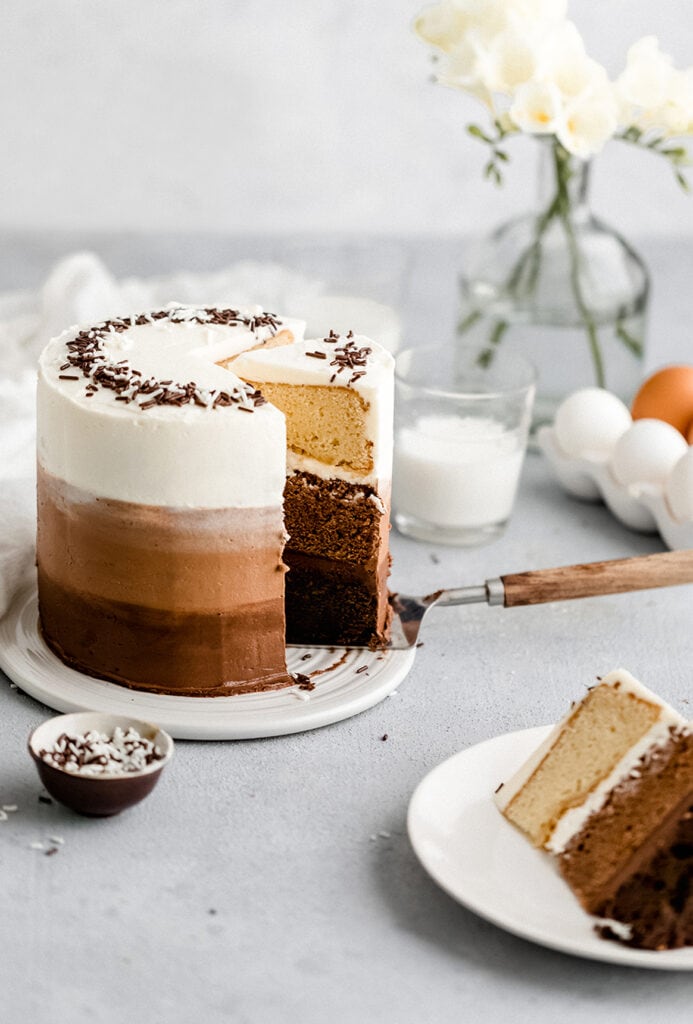
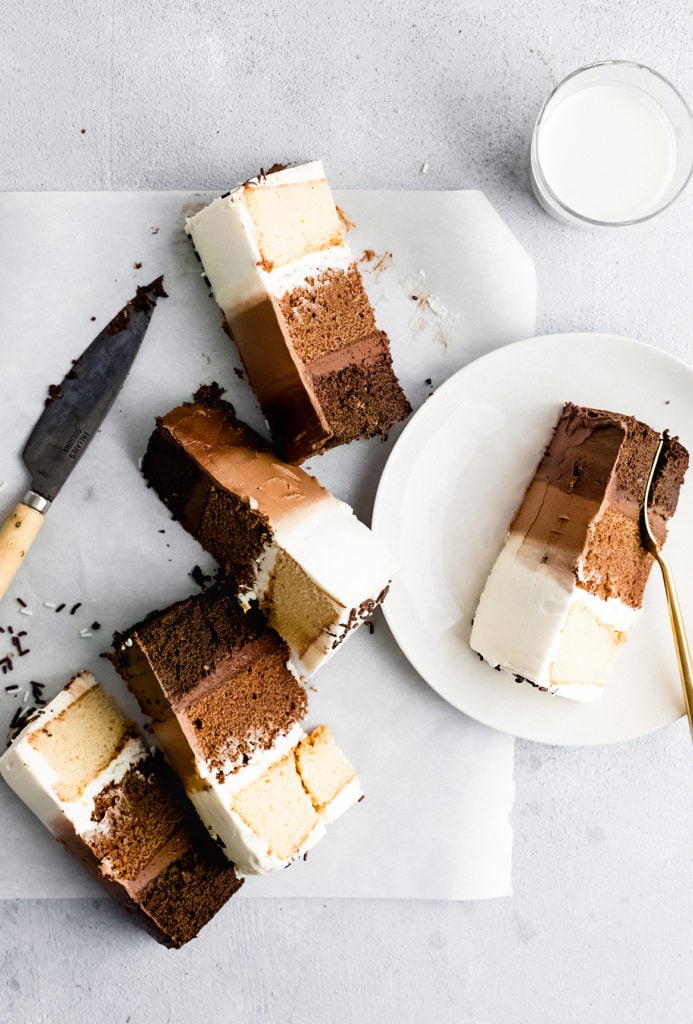
- All you need is 1 cake batter, which gets divided into 3 bowls before adding the melted chocolate. To have 3 equal parts I use a kitchen scale, no eye-balling here! You want those layer to be perfectly even. Same height, texture and baking time.
- Measure using a scale and melt the chocolate in the microwave. Allow to cool a bit before adding it to each bowl.
- Once your cakes are baked and cooled, it’s time to prepare the ombre icing. Decorating cakes is my favorite part, and using pre-made icing makes it so much easier.
- Assemble your layers: add the darkest layer to the base of a cake stand. Top with a few tablespoons of Rich Chocolate icing. Repeat with the following layer using the Warm Vanilla icing. Top the white chocolate cake layer with Warm Vanilla icing as well.
How to make ombre icing
- To make an ombre effect on this triple layer cake, place the remaining Rich Chocolate icing in one bowl and the Warm Vanilla icing in a separate bowl. Add a scoop on each icing into a third bowl and mix to create a lighter brown color.
- Fill 3 piping bags with each icing and cut off the tips of the bags, no need to use a piping tip. Start with the first color (Warm Vanilla icing) and pipe it on, going around the cake twice. Repeat with the two remaining icing colors; first the lighter chocolate, and finish with the darker chocolate.
- Using a cake scrapper, smooth out the sides cleaning the scrapper as you go. Push in against the cake to get rid of any air bubbles. I find it super helpful to use a turntable!
- Go around the cake until all the sides are completely smooth.
- Smooth out the top of the cake scrapping gently and removing any excess off.
I kept the top super simple and decorated with Wilton Naturally Flavored Vanilla & Chocolate Jimmies Sprinkles! If you’re making this cake ahead of time, place in the fridge for up to 2 days.
There you have it friends! The most delicious and show-stopper triple chocolate ombre cake I’ve ever seen. As always, if you make this cake leave a comment and rate this recipe. I also love seeing your creations so share them with me on Instagram using the hashtag #yogaofcooking.
Happy Baking!
Chocolate Ombre Cake
- Total Time: 1 hour 15 minutes
- Yield: 1 cake
Description
This chocolate ombre cake is delicious and easy to make! Dark, milk and white chocolate layers are covered with smooth warm vanilla and chocolate icing, making this a show-stopper dessert perfect for any occasion!
Ingredients
For the Cake Batter
- 1 cup butter (8 oz), room temperature
- 2 cups sugar (14oz)
- 4 eggs (6.8 oz)
- 1 cup buttermilk (8oz)
- 3 cups flour (13.5 oz)
- 1/2 tsp salt
- 2 1/2 tsp baking powder
- 1/2 tsp soda
- 1 tbsp vanilla
For the Chocolate Cake Layers
- 1/2 cup dark chocolate melted + 1 tbsp canola oil
- 1/2 cup milk chocolate melted
- 1/2 cup white chocolate melted
Instructions
- Preheat your oven to 350F. Grease and line 3 6-inch cake pans with parchment paper.
- In the bowl of a stand mixer, fitted with the paddle attachment, beat the softened butter until smooth. Add in sugar and continue mixing. Add vanilla and eggs, one at a time, and mix until well combined.
- In a separate bowl, whisk together flour, salt, baking powder and baking soda.
- Alternate mixing in the dry ingredients and the buttermilk, beginning and ending with the dry ingredients. Do not overmix.
For the Chocolate Cake Layers
- Using a kitchen scale, split the batter amongst 3 separate bowls. Add the melted and cooled dark chocolate to one bowl, and repeat with the milk and white chocolate adding it to the remaining 2 bowls.
- Transfer to prepared cake pans and smooth out the tops. Bake for 25-30 minutes, or until toothpick inserted in center comes out clean.
Assemble your Chocolate Ombre Cake:
-
To assemble the cake, place the dark chocolate layer on a cake stand (or turntable, if using). Spread the chocolate icing on top of the cake. Repeat with the following layers, finishing with the white chocolate layer on top and warm vanilla icing.
- To make an ombre effect, place the remaining chocolate icing in one bowl and the warm vanilla in a separate bowl. Add a scoop on each icing into a third bowl and mix to create a lighter brown color.
- Fill 3 piping bags with each icing and cut off the tips. Start with the first color (vanilla icing) and pipe it on, going around the cake twice. Repeat with the two remaining icing colors; first the lighter chocolate, and finish with the darker chocolate.
- Using a cake scrapper, smooth out the sides cleaning the scrapper as you go. Push in against the cake to get rid of any air bubbles and excess icing.
- Go around the cake until all the sides are completely smooth.
- Smooth out the top of the cake scrapping gently and removing any excess off.
- Decorate with Vanilla & Chocolate Jimmies Sprinkles.
- Prep Time: 45
- Cook Time: 30
- Category: Dessert
- Cuisine: American
Note: I used 2 tubs of each Wilton Naturally Flavored Vanilla Icing and Naturally Flavored Chocolate Icing.
Want more chocolate recipes? Check these out!
This post is sponsored by Wilton. All opinions are my own. Thank you for supporting the brands that make Yoga of Cooking mindful.

This cake looks like absolute perfection!! My weekend baking project!
Thanks, Diala! Let me know how it goes! I’d love to see it 🙂
This cake is beyond beautiful!! Can’t wait to try that chocolate icing!!!
Thank you! The chocolate & vanilla icing are delicious!
This is such a stunning cake. I am absolutely in love with your recipes and photos. And I just love the idea of these frostings!!! They are definitely a must try!!! Fantastic work. I’m a big fan!!!
Thanks so much, Camila! I truly appreciate that and hope you try these Wilton products 🙂
Oh my god!!!! this cake looks amaaazing 😱 I need to try this ASAP
Yes, you do!! Let me know how it goes! xo
This cake looks delicious! Thanks for that recipe i will definitely try to make it!!
Hope you love it! xo
This is such a beautiful cake! I’m usually too intimidated to make a cake like this but you persuaded me to try with these gorgeous photos!
Also need to try those icings!!
Thanks, Mandi!! So happy you liked it!
Looks delicious and beautifull! The recipe is easy and very well explained. I will do it in my next dinner with friends.
So glad you think so! Hope you enjoy making it 🙂
Looks mouthwatering, the combination of the three chocolates is such a great idea.
Thank you so much! It’s a delicious cake for sure!
This looks absolutely amazing! Not only the cake, but your photography! Simply stunning!
Thanks, Meg! You’re so sweet! xo
Omg!!! That frosting is gorg!
Thanks so much, Jenny!
This looks stunning and I can’t wait to bake it this weekend! What flour do you recommend though?
Hi Kellie! My go-to is unbleached all purpose flour from Bob’s Red Mill and/or King Arthur! let me know if this helps! xo
absolutely beautiful cake. didn’t quite look like yours but tasted divine. 🙂
Hi Rosana
I have some questions for you. For the chocolate layers I’m curious what type of chocolate do you use? Also when frosting just want to confirm do you pipe and scrape each layer individually or do you pipe all 3 frostings than scrape at once? Will definitely share a pic when I complete the cake.
For the chocolate layers, I used chocolate chips (white, milk and dark/unsweetened). For the frosting, I piped the 3 layers, dark at the bottom, lighter in the middle and white at the top, then scraped all at the same time. Hope this helps!!
hey, i have a question. how many people can serve this cake?
this cake looks absolutly fantastic! probely going to make this for my friends birthday tomorrow.
This cakes serves about 8!
Could I use 8 inch tins for this?
You could but baking time would be different and the cake height shorter as well.
Literally the best cake I’ve gotten to make — I opted for nuts and added just a bit more oil to anything without chocolate and it turned out perfect!! Amazing and honestly very fast and easy cake for just about any event!!
Love that you made it your own!
Turned out really well! It was much harder to frost and get good lines than I expected, but it was still pretty.
It can take a little bit of practice but it’s not supposed to look perfect either! I’m so glad you liked it 🙂