Apple Galette with Puff Pastry
Apple Galette with Puff Pastry is an easy and delicious fall dessert. It is made with a store-bought buttery and flaky crust and a sweet apple filling. For the perfect bite, serve warm with a scoop of vanilla ice cream and a drizzle of salted caramel!
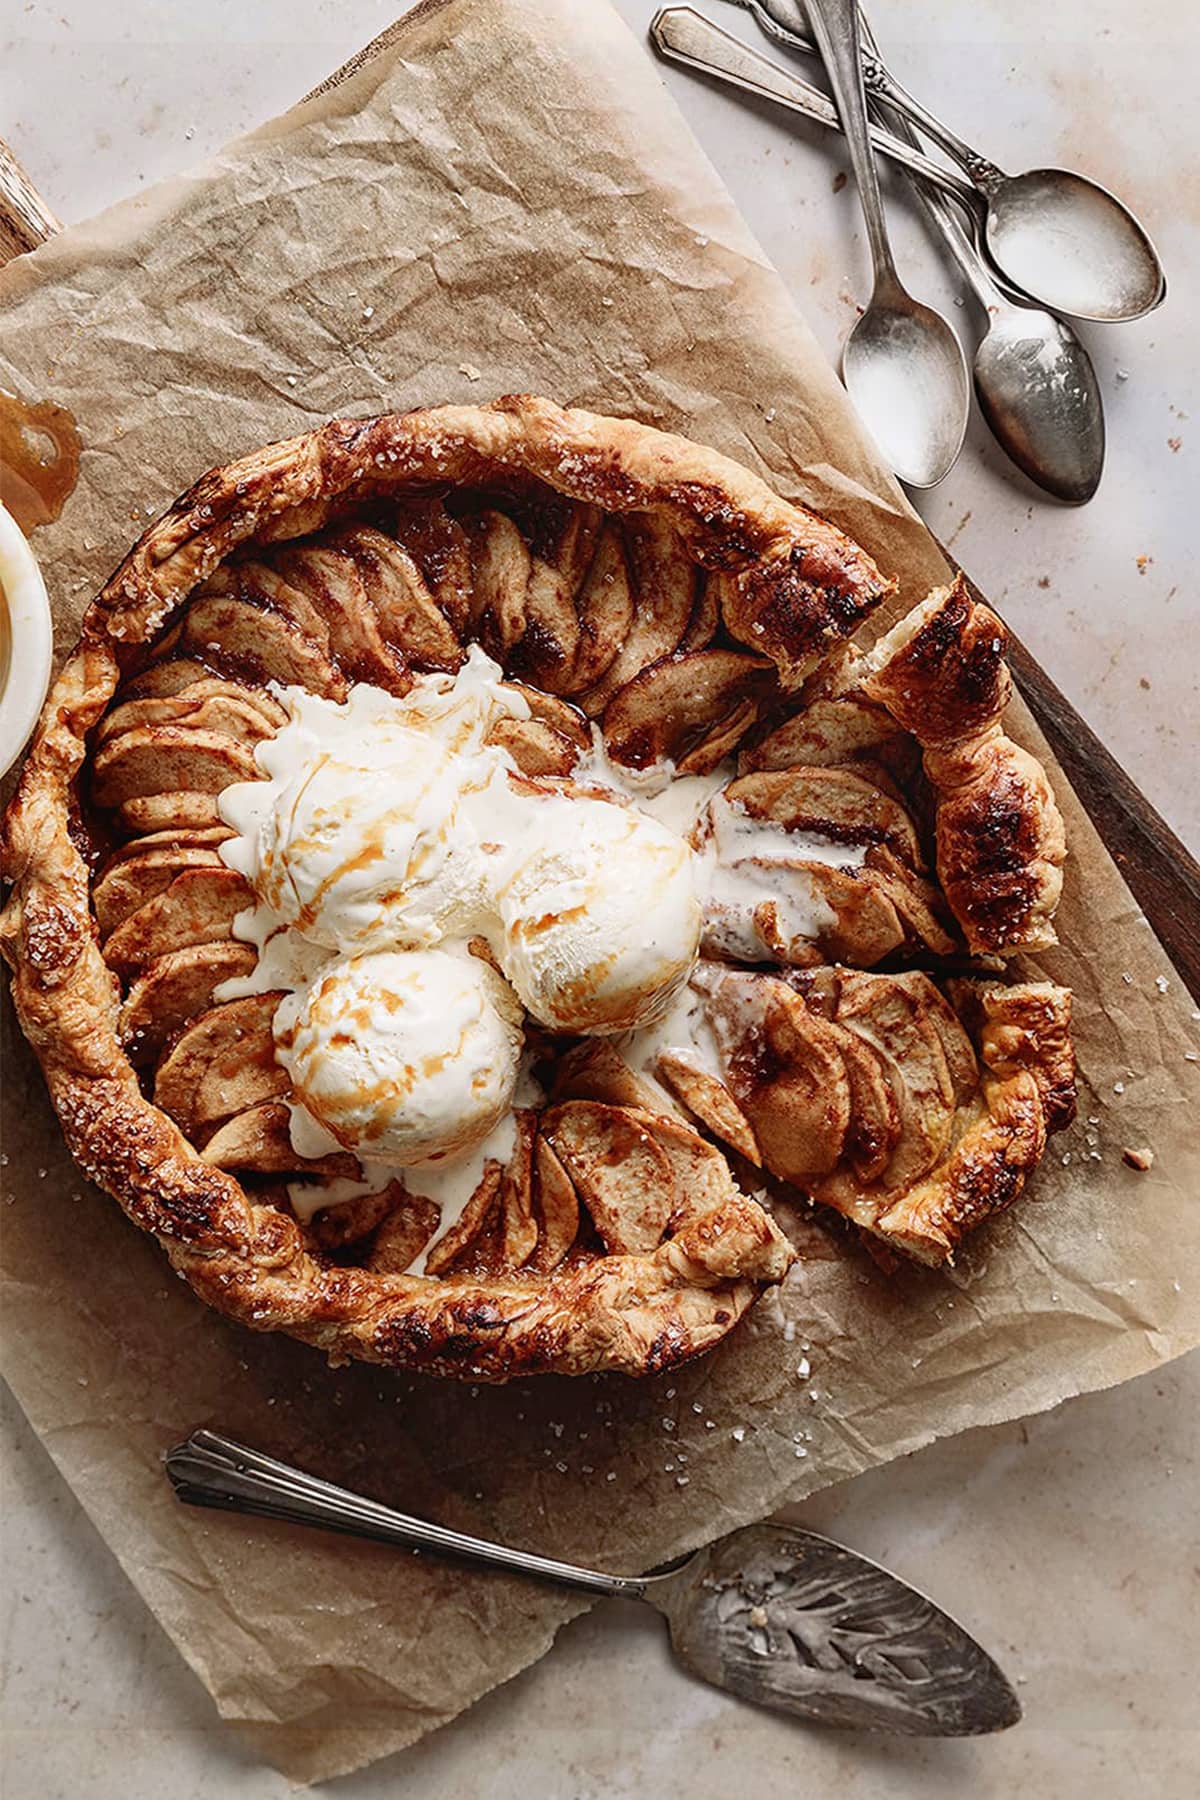
This Apple Galette with Puff Pastry is the perfect alternative to apple pie! It has all the delicious elements of a pie – flaky crust, sweet fruity filling, vanilla ice cream on top – and none of the difficult techniques. I love making it for Fall dinner parties, especially on Thanksgiving when I need a quick and impressive looking dessert that everyone will love.
About Apple Galette with Puff Pastry
- Taste – this rustic apple galette is sweet and slightly tart, with a rich, buttery pastry complementing the natural sweetness of the apples.
- Texture – The crust of this apple galette is flaky and buttery while the apple filling is soft and tender, filled with fall spices.
- Effort – This easy galette recipe is perfect for beginner bakers. All you have to do is roll the puff pastry dough, slice the apples and bake!
- Time – It takes about 30 minutes to assemble and bake this easy puff pastry apple galette, making it a great dessert for busy weeknights or last-minute gatherings.
What is a Galette?
A galette is a rustic French pastry made with a free-form crust (using pie dough or puff pastry) and a variety of sweet or savory fillings, such as fruit, vegetables, or cheese. Galettes have a thin and flaky crust that is folded over the edges of the filling, creating a casual and “imperfect” appearance, making it one of the most approachable yet impressive desserts.
Why You’ll Love this Recipe
This easy puff pastry apple galette is one of the most delicious desserts you can make this Fall. It is made with store-bought puff pastry, so you don’t have to worry about making your own pie dough – it’s basically a free-form apple pie but half the time and work! It comes together in just under 40 minutes and you’ll be amazed at how fun it is to make.
Ingredients
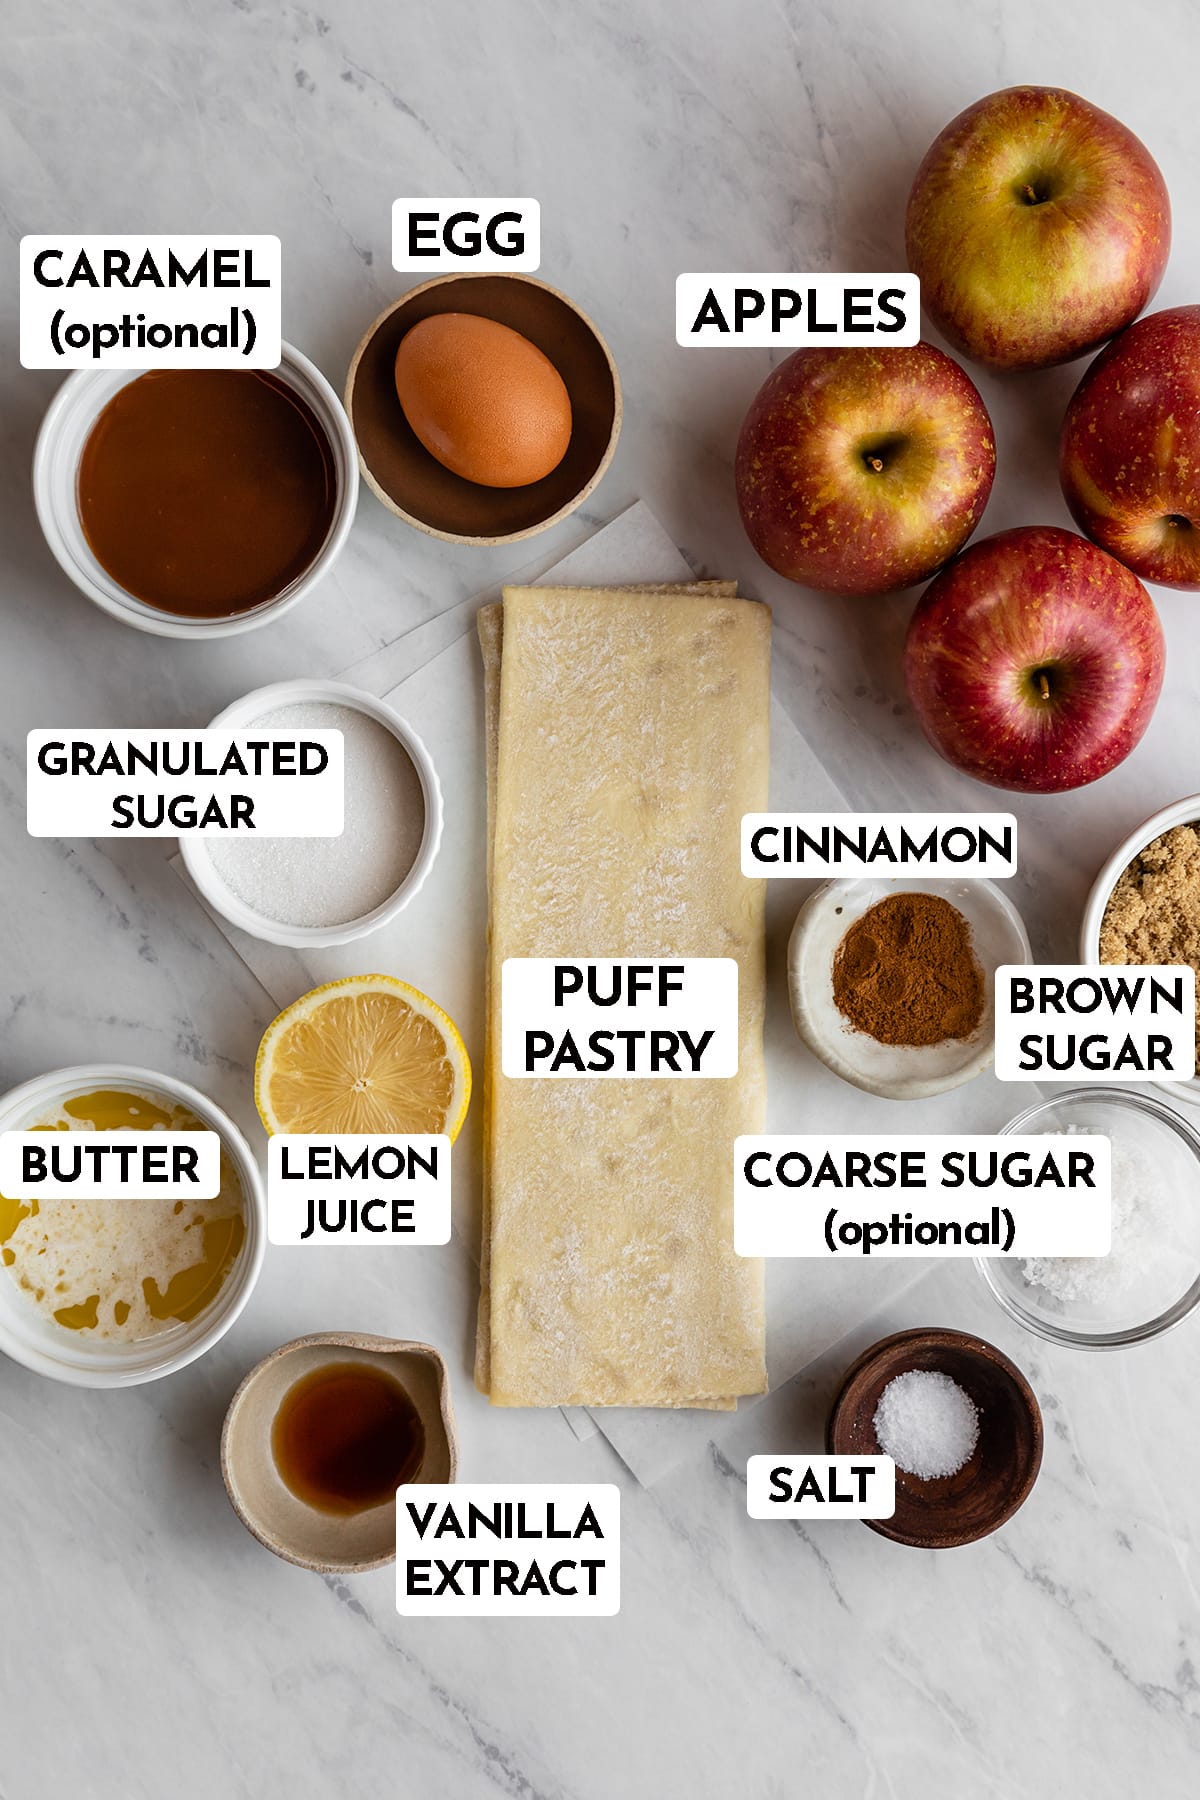
- Puff Pastry (store-bought): A flaky and buttery pastry made from layers of dough and butter, perfect for creating a crispy crust.
- Apples: This recipe calls for Honeycrisp apples, but any type of sturdy apple (Granny Smith, Pink Lady) will work. The apples should be peeled, cored, and thinly sliced.
- Sugar: Adds sweetness to the apple filling creating a caramelized effect as it bakes. This recipe calls for a combination of granulated sugar and light brown sugar.
- Cinnamon: this warm spice goodness enhances the flavor of the apples.
- Lemon Juice: brightens the flavor of the apple filling and prevents the apples from browning.
- Butter: A small amount of butter is mixed with the apples for extra flavor and richness.
- Vanilla Extract: adds a subtle hint of vanilla flavor to the filling for a more complex flavor.
- Salt: A pinch of salt balances the sweetness and enhances overall flavor.
- Egg Wash: A beaten egg used to brush the pastry gives it a shiny and golden finish.
- Sparkling or Coarse sugar (optional): sparkling or coarse sugar (such as turbinado or demerara sugar) is sprinkled on top of the galette before baking to give the crust a crunchy texture and a bit of extra sweetness.
- Caramel sauce (optional): an optional topping or drizzle for your apple galette
- Vanilla ice cream (optional): Vanilla ice cream is a classic pairing for apple galette.
See recipe card for quantities.
Substitutions and Variations
- Pie Crust (store-bought): If you don’t have puff pastry, you can use pie crust instead. Just be sure to roll it out to a thin circle before assembling the galette.
- Apples: Any type of apple will work for this recipe, but some popular choices include Granny Smith, Golden Delicious, and Honeycrisp apples. You can also use a combination of different types of apples.
- Fruit: Experiment with different fruits such as pears or berries. Check out my Puff Pastry Strawberry Galette and my Peach Galette. Avoid using canned fruit.
- Nuts: You can add chopped nuts to the apple filling, such as walnuts, pecans, or almonds.
- Spices: While cinnamon is traditional, you can use nutmeg, allspice, cardamom, or ginger for a different flavor profile.
- Jam or Preserves: A spoonful of apricot jam or preserves can intensify the apple flavor.
Instructions
Puff Pastry Crust
- Prepare oven – Heat oven to 425ºF. Line a rimmed baking sheet with parchment paper, or Lightly grease the cast iron skillet with butter or cooking spray.
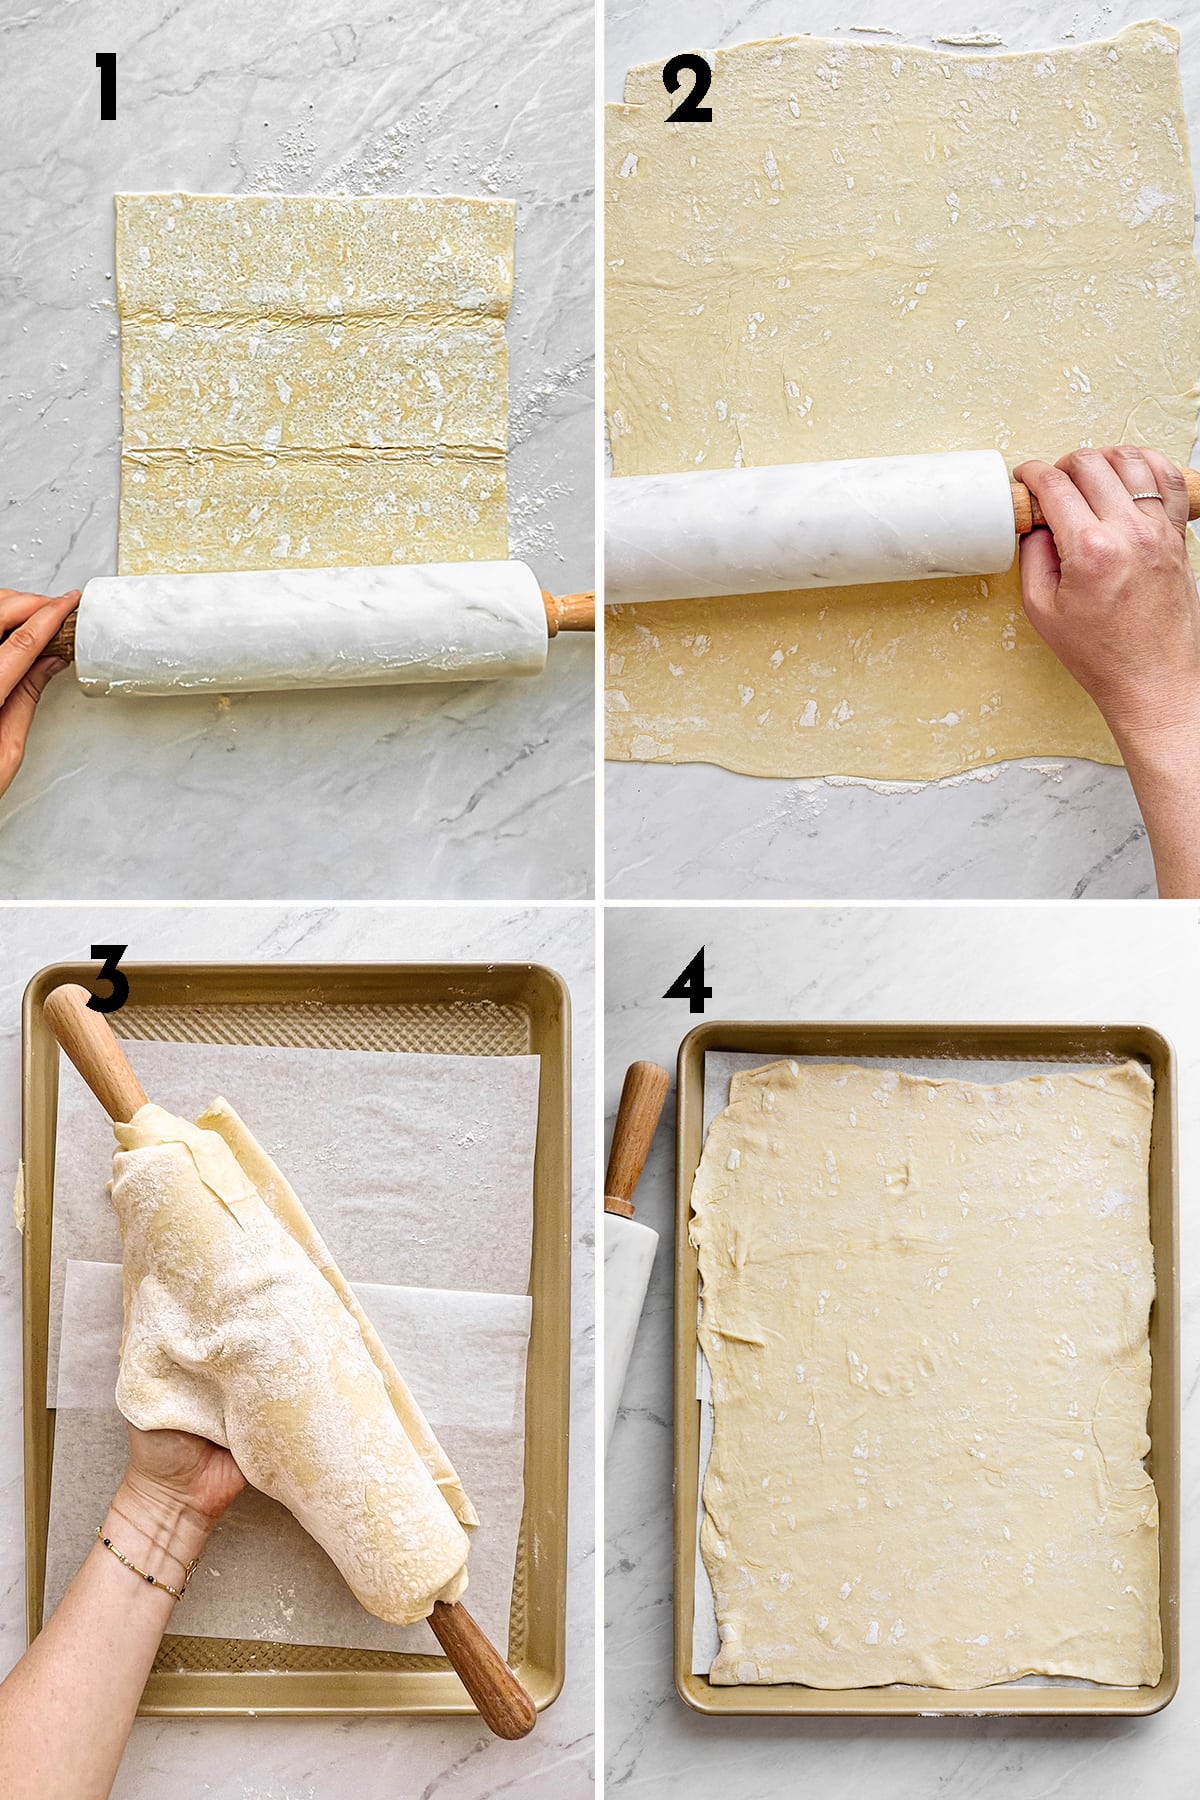
- Prepare the puff pastry – On a lightly floured surface, roll out one puff pastry sheet into a 16-by-14-inch rectangle (Photo 1 and 2). Place the pastry sheet on the rolling pin and transfer to the prepared baking sheet (Photo 3 and 4). Refrigerate while preparing the apple filling.
Top Tip: refrigerating the puff pastry dough ensures it will hold its shape while baking.
Apple Galette Filling
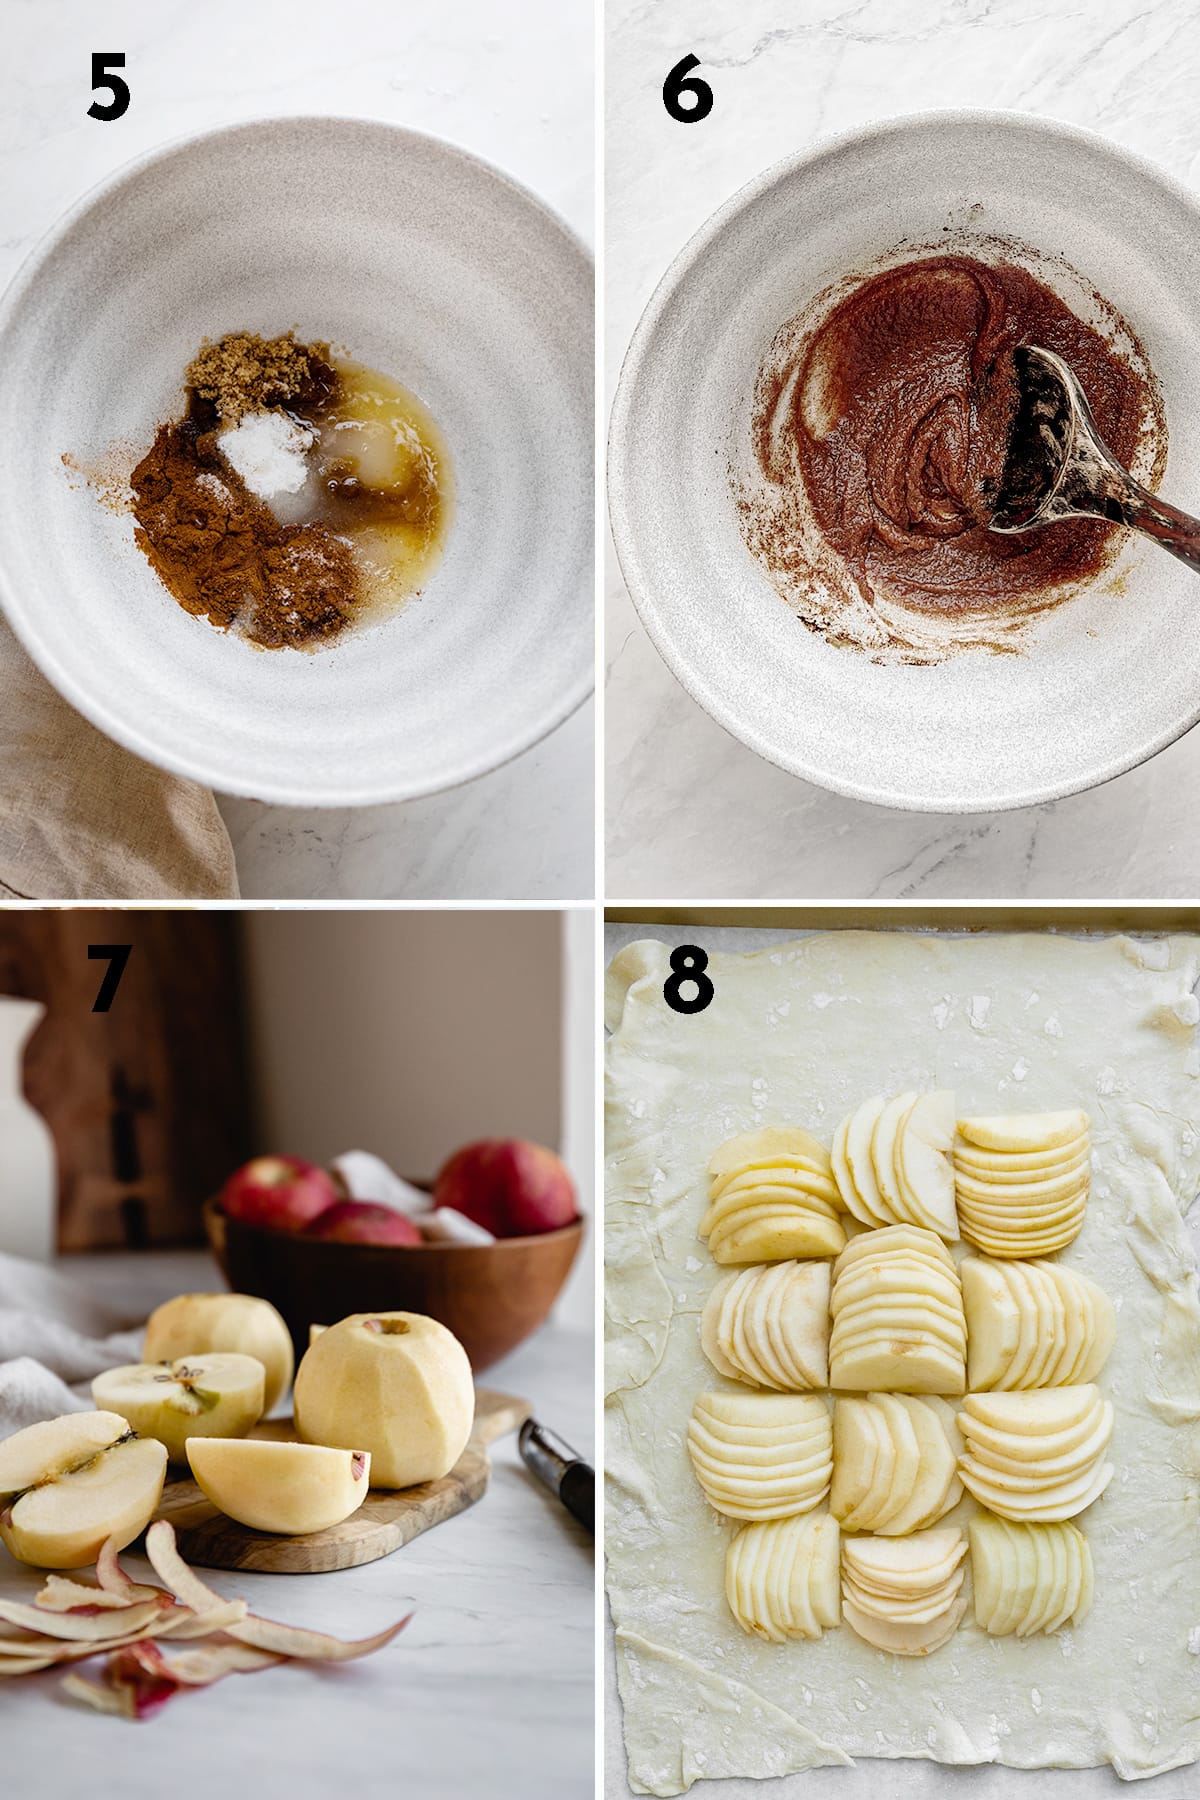
- Prepare the apple filling – In a large bowl, combine the melted butter, brown sugar, granulated sugar, cinnamon, salt, vanilla and lemon, stirring until fully incorporated (Photo 5 and 6).
- Arrange the filling – Peel and thinly slice the apples (Photo 7). Arrange them in the center of the pastry dough (Photo 8).
Top Tip: when arranging the apples, leave a border of about 1-2 inches around the edges of the pastry dough before folding the edges over the apples.
Assemble the Galette
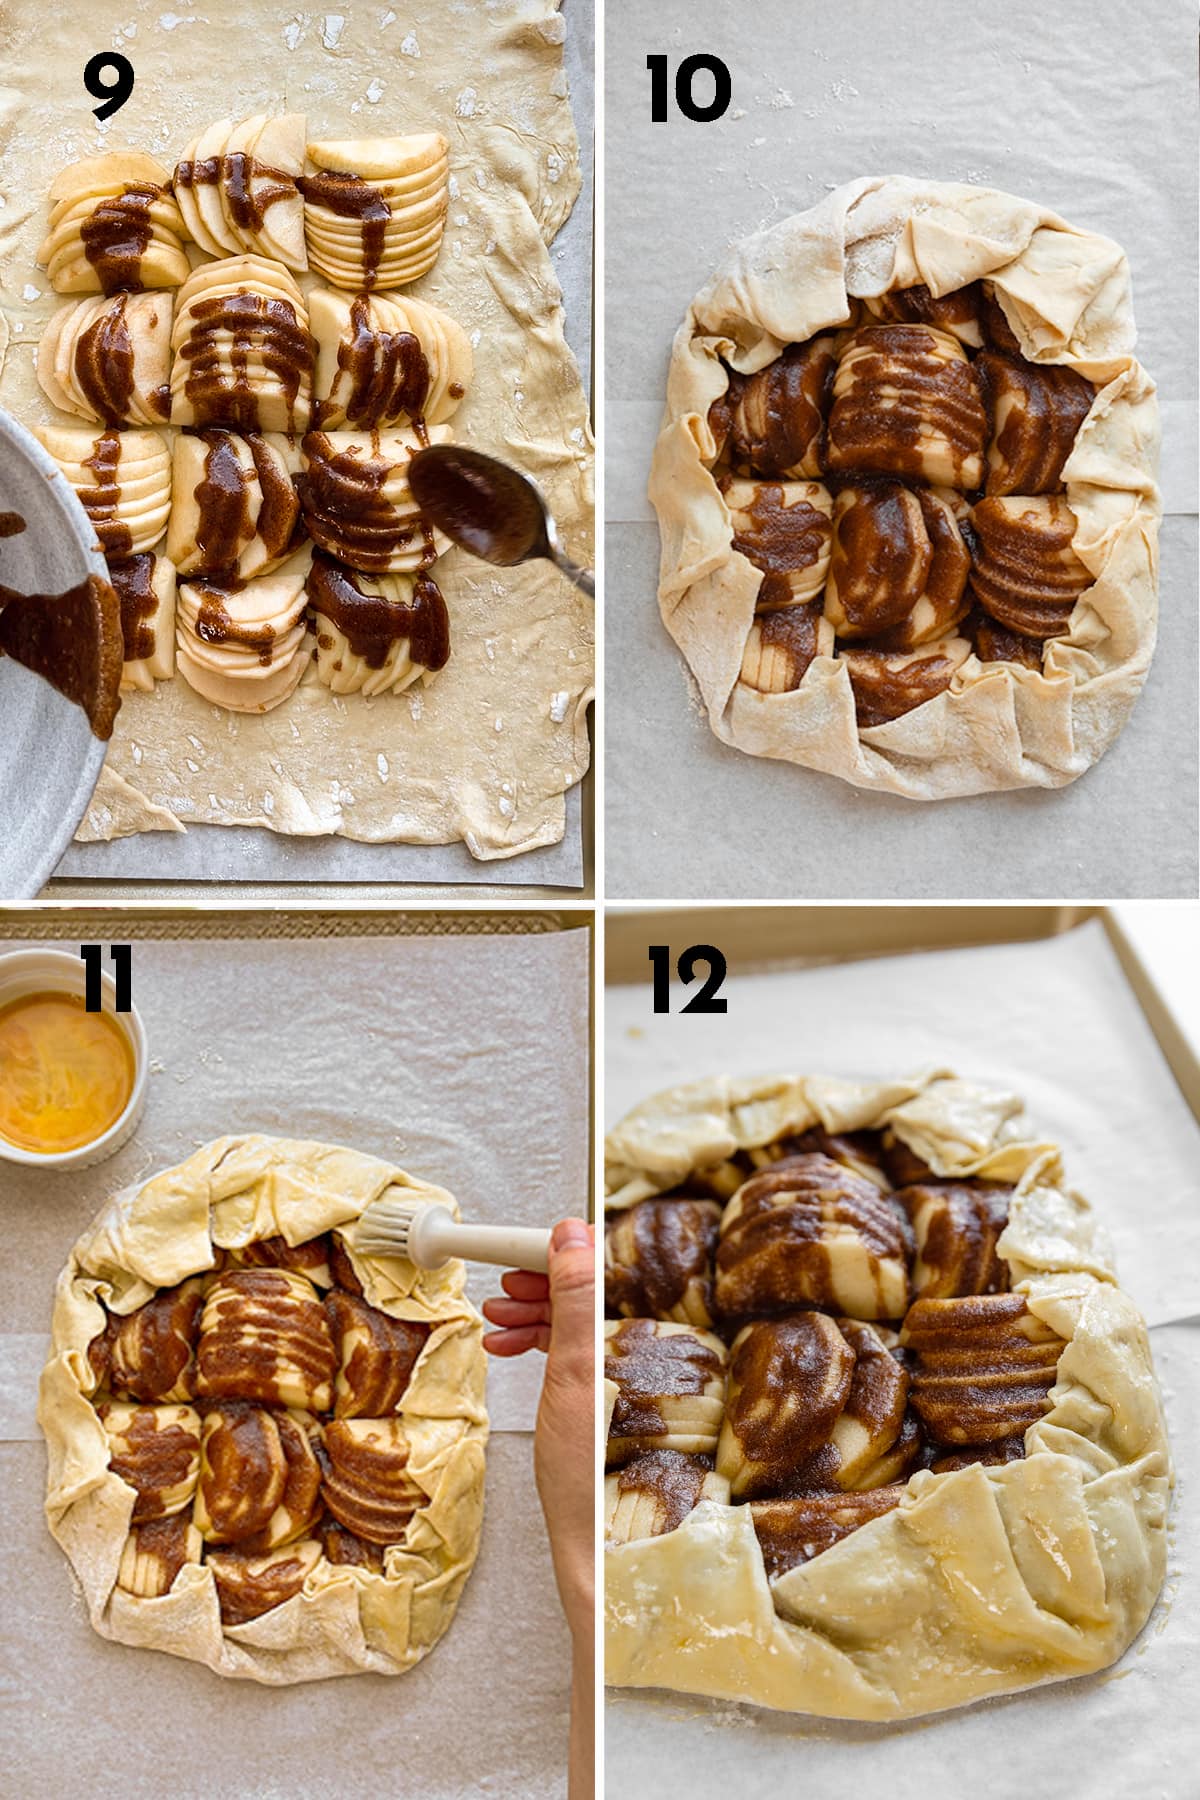
- Coat apples with butter-sugar mixture (Photo 9) .Fold and tuck the edges of the puff pastry over the apples, overlapping the dough as needed (Photo 10). Brush with egg wash and sprinkle coarse sugar around the edges (Photo 11 and 12).
Bake and Serve
- Bake – Bake until the filling is bubbly, the apples are soft and tender and the crust is golden brown, about 35-40 minutes.
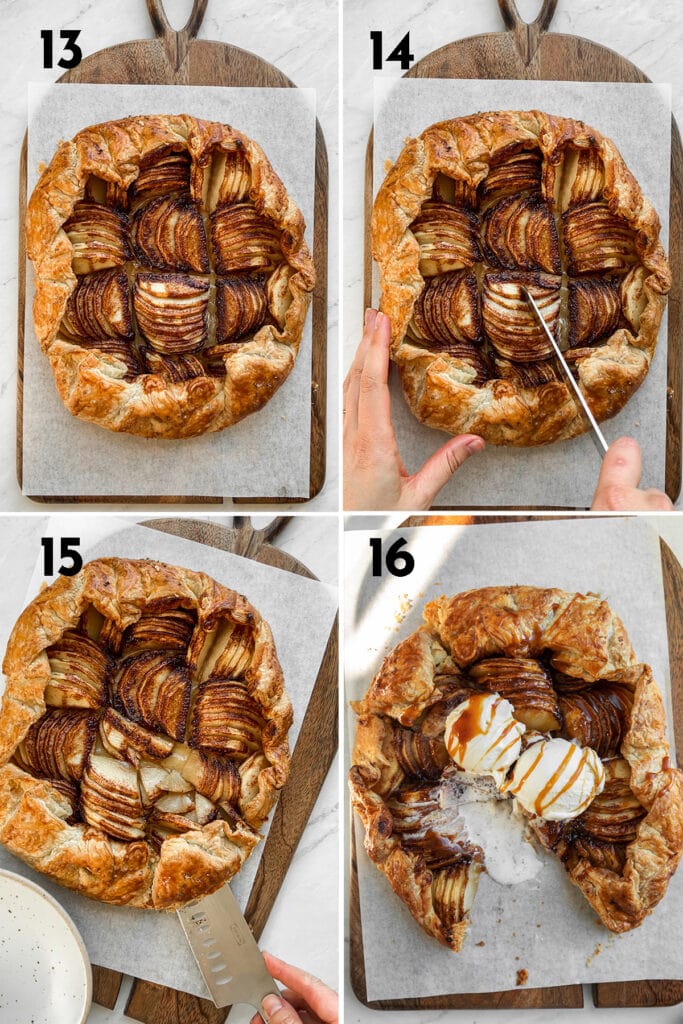
- Cool – Remove from the oven and allow to cool on the baking sheet or skillet for 10 minutes before slicing and serving (Photo 13).
- Serve – slice into wedges and serve warm (Photo 14 and 15).
Top Tip: if the edges of the puff pastry start to brown too quickly, cover them with foil for the last few minutes of baking.
How to Serve Apple Galette
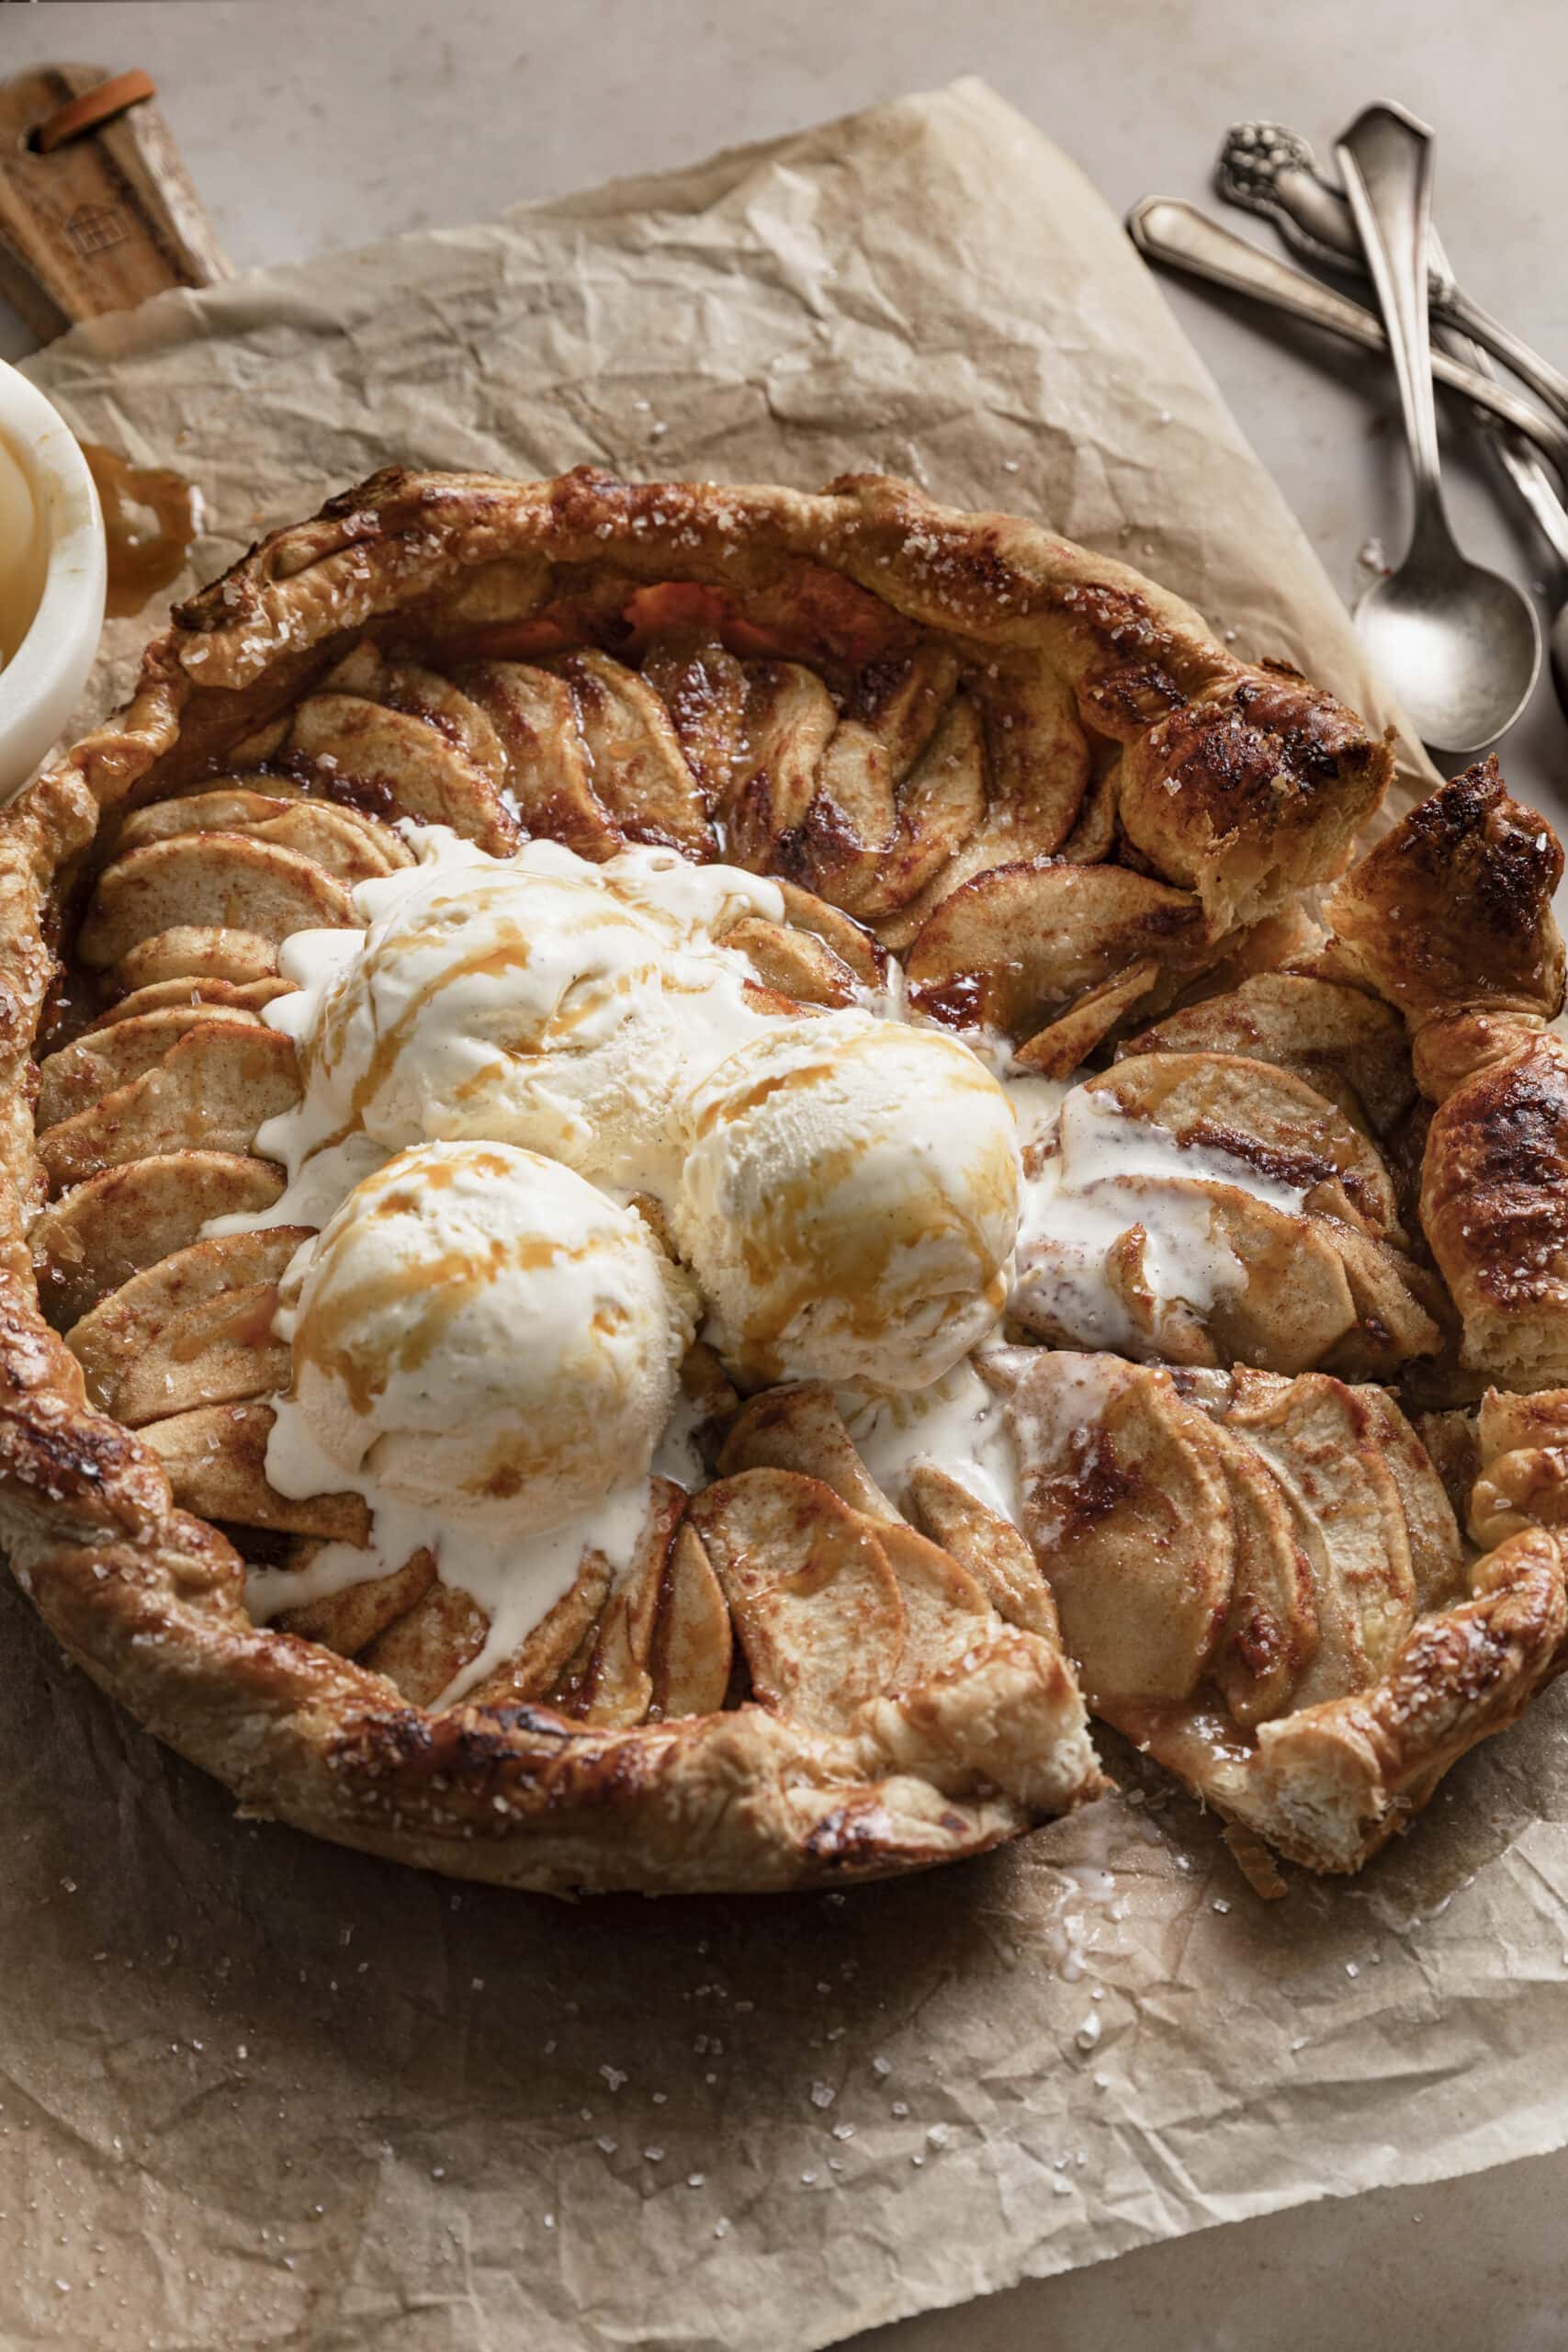
To serve this galette, let it cool slightly and cut it into wedges using a sharp knife. Top with a scoop of vanilla ice cream and a drizzle of store-bought caramel sauce for extra indulgence (Photo 16). If you prefer a simple presentation, a light dusting of powdered sugar is a great alternative. No matter how you serve it, this apple galette will be a crowd-pleaser.
Equipment
This recipe doesn’t call for any special equipment. You’ll need:
- A rolling pin to roll out the dough. Tip: a bottle of wine also does the trick!
- A baking sheet lined with parchment paper.
Storage
- To store, let it cool completely, wrap it tightly in plastic wrap or foil and store it in the refrigerator for up to 3 days.
- To freeze, let it cool completely, wrap it tightly in plastic wrap and then in foil. Place in a freezer-safe bag and freeze for up to 3 months.
- To thaw frozen apple galette, place it in the refrigerator overnight. Once thawed, let the galette come to room temperature for about 30 minutes before serving. You can also reheat the galette in a 300ºF oven for about 10 minutes, or until warmed through.
Top Tips
- When rolling out puff pastry remember to keep it cold (not frozen), work on lightly floured surface and roll in one direction. Avoid stretching the dough to maintain an even thickness.
- Don’t overwork the dough. Overworking the dough will make the pastry tough. When rolling out the dough, be gentle and handle it as little as possible.
- Brush the edges of the dough with egg wash, this will help to seal the edges of the dough and prevent the filling from leaking out.
- Don’t overfill the galette. If you overfill the galette, the filling will spill out and make a mess. Leave a border of about 1 inch around the edge of the dough before adding the filling.
- For a sweeter apple galette, use all brown sugar instead of granulated sugar.
- For a more tart apple galette, use Granny Smith apples instead of Golden Delicious apples.
- To prevent the bottom of the galette from getting soggy, preheat the baking sheet in the oven while it is preheating. Then, place the galette on the hot baking sheet when you are ready to bake it.
Recipe FAQs
Related Recipes
Did You Like This Recipe?
Love this easy apple galette with puff pastry recipe? Please leave a 5-star rating in the recipe card & leave a comment below. Thanks!
Sign up for Yoga of Cooking’s newsletter and keep in touch on Instagram, Pinterest, TikTok, and YouTube.
Happy Baking!
Print
Apple Galette with Puff Pastry
- Total Time: 40 minutes
- Yield: 8 servings
Description
Apple Galette with Puff Pastry is an easy and delicious fall dessert. It is made with a store-bought buttery and flaky crust and a sweet apple filling. For the perfect bite, serve warm with a scoop of vanilla ice cream and a drizzle of salted caramel!
Ingredients
- 1 sheet frozen puff pastry, thawed
- 3–4 apples, peeled, cored and thinly sliced
- 3 tbsp unsalted butter, melted
- 1/4 cup light brown sugar
- 1/4 cup granulated sugar
- 1 tsp ground cinnamon
- 1/2 tsp kosher salt
- 1/2 tsp vanilla extract
- 1 tsp lemon juice
- 1 egg, beaten, for egg wash
- 1 tbsp coarse sugar, optional
For Serving:
- Vanilla ice cream
- Caramel sauce, store-bought or homemade
Instructions
- Preheat the oven to 425ºF. Line a baking sheet with parchment paper.
- On a lightly floured surface, roll out the thawed puff pastry sheet into a 16″x14″ rectangle. Place the pastry dough on the rolling pin and transfer to the prepared baking sheet
- In a medium bowl, combine the melted butter, brown sugar, granulated sugar, cinnamon, salt, vanilla extract and lemon juice. Stir until fully incorporated.
- Peel, core and thinly slice the apples and arrange them on top of the puff pastry. Coat with butter-sugar mixture using a spoon. Fold and tuck the edges of the puff pastry over the apples, overlapping the dough as needed. Brush with edges of the puff pastry with the beaten egg (also known as egg wash). Sprinkle sparkling sugar around the edges, if desired.
- Bake in the preheated oven for 25-30 minutes, or until the crust is golden brown and the apples are tender.
- Let the galette cool for a few minutes before slicing and serving. Serve warm, with vanilla ice cream and drizzle with caramel sauce.
Notes
- Baking Time: if the edges of the puff pastry start to brown too quickly, cover with foil for the last few minutes of baking.
- Apples: the best apples for a galette are baking apples, but you can use any variety such as Granny Smith, Honeycrisp, Pink Lady, Fuji.
- Chilling the puff pastry dough while preparing the filling ensures it will hold its shape while baking and makes it easier to fold and tuck.
- Storage: to store, wrap galette in plastic wrap or foil, refrigerate for up to 3 days. To freeze, wrap it in plastic wrap and then in foil, place in a freezer-safe bag and freeze for up to 3 months. To thaw, place in refrigerator overnight. Once thawed, let it come to room temperature, about 30 minutes, before serving. Or, reheat the thawed galette in a 300ºF oven for about 10 minutes.
- Prep Time: 10 minutes
- Cook Time: 30 minutes
- Category: Dessert
- Cuisine: American, French

Hi dear Rosana
I really interested in your creative recepies.
Thank you so much and good luck.
This was a great recipe. I used Truvia brown sugar blend and it turned out fabulously.
One question though: Do you have nutritional info for this? Thx!
I’m so glad you liked it!
This was rustic and luscious! I actually made it exactly like you wrote it out and it is a keeper, which I am passing on to my children and, hopefully, their children! Thank you so much for such an easy, attractive, and tasty way to end an October Saturday supper!
I’m so happy you liked it!!!
Hello, I have a question please. I baked this on the parchment paper in the cast iron skillet. Was that how you intended it be done?? It was very good but I felt like the puff pastry crust was rather soggy and not as crisp as I would have expected. I would love to make this again, would you have any suggestions?
Hi! I didn’t use parchment with the cast iron and my guess is that it might have caused some moisture to build up and make your crust soggy. I can see how the photos might make you think to use parchment, but it was only meant for serving purposes! For future reference, if it’s not suggested in the instructions, don’t use it 🙂
This looks lovely and delicious, just in time for Thanksgiving
Thank you so much!!